Forward - Fitting Out
Forward - Fitting Out | |
|
There are a number of components needed strengthen the boat for the fordeck and mast. There are few right angles and a lot of curves so most parts were shaped and trial fitted against the boat.
Framing was added first for the top of the bow tank to fit on. I found the curve was too tight for wood to pull into shape when screwed to the hull so planed the framing to fit the curve of the hull. |
 |
| The ply bow tank top was cut to fit the hull. A hole was cut for the inspection hatch. A circle of ply was fitted underneath to strengthen the ply where the inspection hatch would be screwed to it. Before this was glued the floor at frame B was fitted allowing the floor the be screwed to frame B. |  |
| The intermediate beam was cut roughly to size and screwed to the inwhale. It was then planed to size more accurately with a spokeshave. A length of wood placed across the the intermediate deck beam and the beams on frames A and B was used to determine when the beam had been planed to the correct shape. |  |
| A slot was cut in the king plank to fit the top of the bow girder. This was done using a Japanese pull saw as I find this accurate enough and quicker than setting up the table saw. The king plank was screwed to the bow girder, frame A deck beam, intermediate deck beam and frame B deck beam. |  |
| The mast support was cut and planed to size. If I had cut the underside of the deck beam at the same angle as the top of the tank it would have been easier to fit. |  |
| At this point I decided to depart slightly from the plans and fit a strip of hardwood on the king plank. This makes a feature of the join between the two ply foredecks which will hopefully save sanding and filling later on. The foredeck was dry fitted to help determine the position of the deck beams. |  |
|
There are two deck beams which support the foredeck and the hanging frame which the forward end of the thwarts attach to. This was a complex piece to make as it does not have a single right angle. A sliding bevel was very useful. The inwale end was cut at an angle vertically and horizontally. Wood was then removed to accomodate the inwale. The forward end of the beam was cut at an angle so it was vertical, it was then planed in the same way as a scarph joint, but at an angle to the length of the wood. |
 |
| A spokeshave was used to plane the curve on the top of the beam with the beam fixed in position. A length of wood placed along the foredeck was used to check the shape of the curve. The foredeck was dry fitted to check the curve, then the beam was removed and the curve on the underside planed with a spokeshave. |  |
| The website is now completely out of order with the build. The hanging frames, side decks, bow stem cap and gunwales have now been fitted - see other sections. The bow was filled with buoyancy blocks made from 2 part polyurethane cut to shape with a knife. The foam could just have been poured in but it would stick to the hull. If the boat ever needs repairing foam that can be removed will make the task much easier. | 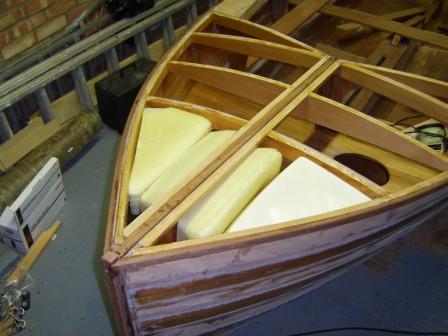 |
|
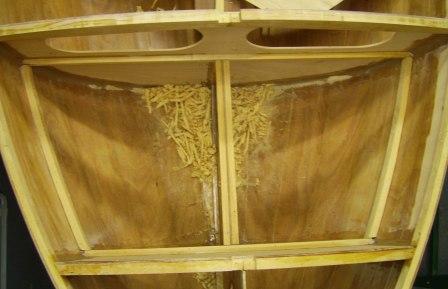
The underside of the fordeck and a number of other surfaces would be less accessible once the
foredeck was fitted. All these surfaces were given 2 coats of epoxy then the foredeck was fitted.
A hardwood coaming and a ply tabernacle was made and fitted to the foredeck. |
 |